Last week we held our second Local is Lovely Pracshop and it was just as wonderful, inspiring and fun as I'd hoped it would be. And as with
our first Pracshop last November, it also reminded me how good it is to collaborate and share your ideas, experience and skills with others.
The team we had brought together to teach this workshop;
Luisa Brimble (photography),
Stephanie Stamatis (styling), my Mum Annie Herron and
The Flower Era florist Amelia Toohey, were a dream to learn from and work with and I really hope we can all align our diaries again to put together some more workshops for later in the year. For now though, here are a few pictures, words and recipes from last week. Thank you so much everyone who came to learn, teach and cook with us, especially Luisa Brimble who really made the whole thing take flight and whose generosity, beautiful spirit and talent continually blow me away.
.jpg)
-73.jpg)
We started our two day Pracshop with a talk by my mum, artist
Annie Herron (above), who gave us all an overview on the art of seeing, the rule of thirds and some basics on perspective. As she said, with digital photography it's just so easy to snap away without really stopping and thinking about what we're actually photographing, how we have composed the shot and whether every element in it is working or not.
She told the story of famed artist
Brett Whitely who, in his Sydney studio would tack his huge canvases up against a wall and set a chair way back against the opposite wall. He'd sit there for hours, staring at his work from a distance then dart forward, paint or edit something then return and realy look at the canvas all over again. Mum wasn't saying that we should all do this with our food photography, but just suggested we slow down a little and look harder before pressing that button.
Morning tea was a warm almond and fig cake and the first of many many cups of tea over the two days. The recipe came from my book but I've added it here below too.
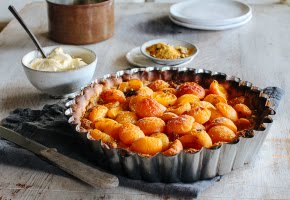
Fig and almond cake
The original recipe for this cake (in my book!) calls for roasted rhubarb but you can, and I do, make it with pretty much any fruit. It's also really good as a plain almond cake to serve alongside poached fruit. The only real key to this cake is to use freshly toasted ground almonds not almond meal from the shops, the nutty, rich flavour and coarse texture are deal breakers (in a good way).
150g unsalted butter
150g caster sugar
2 eggs
1/4 cup buttermilk
180g freshly ground almonds
1 tsp baking powder
6 figs, quartered
topping
Finely grated zest of one orange
30g butter
3 tbsp brown sugar
1/2 cup slithered almonds
Icing sugar, to dust
Preheat oven to 180C and grease and line a 24cm cake tin. Cream the butter and sugar together until light and fluffy. Beat in the eggs, one by one. Fold in the buttermilk, almond meal and baking powder and spread into the prepared cake tin. Push the figs into and over the cake and bake for 1/2 hour.
For the topping, finely melt the butter and stir in the grated zest and almonds. Spread this over the half-baked cake, lower the heat to 160C and bake for a further 20 minutes. Cool the cake in the tin and then top with the almonds and dusting of icing sugar before serving.
Another key player in last week's workshop and its success was farmer
Dougal Munro. Dougal has a farm just out of Orange NSW and will be appearing here on Local is Lovely with a little e-interview next week (whoop). He was also supposed to come along as a student to last week's workshops but farm jobs got in the way, as they do. That didn't stop him from driving down to Rydal on our first morning to deliver a ute-load of incredible produce; the last of his Autumn raspberries, Jerusalem Artichokes, spuds, garlic (enough for everyone to take a bag home each to plant or eat) and best of all I thought, a selection of rare, heirloom apples from his orchard (which happens to hold 30 different varieties of apple tree - cool hey). Here are some of them above and below.
And speaking of helpers in the food department, once again I had the clever
Pip in the kitchen with me, together we ran food out to the studio all day to be either eaten and/or photographed and I am very very grateful for all that she did over the two days. Thanks lady!
After Mum's session and one from Luisa with the basics of manual photography, we trooped outside to get shooting. And first in the frame was the lovely
Ella who came along to help Stephanie with the styling scenes but who most of the time, ended up modelling for us. Without complaint, Ella held baskets of apples, drizzled honey over porridge and rolled pastry like a pro while we clicked away like the papparazi. Meanwhile, Luisa hovered and gave everyone tips on angles, apertures, ISO settings and shooting in general.
After the orchard we returned to the woolshed to make apple pies and once again Ella was put to work in front of the camera.
We used my basic sweet shortcrust pastry recipe (below) then just peeled and sliced our freshly picked apples, before tossing them (oh so artfully) with lemon juice, cinnamon and a little golden caster sugar. The apples were piled into their tart shells, topped with some lattice pastry then baked until golden and bubbly.

Sweet shortcrust pastry
Makes enough pastry for 2 medium-sized tarts
150g cold butter, cubed
1 1/2 cups plain flour
1/2 cup icing sugar
1 egg, cold
Place the flour and icing sugar in a bowl and pop in the freezer for half an hour. Tip your cold flour and sugar into the bowl of a food processor and blitz for a moment. Add the butter and blitz until you have a coarse sand-like texture. Add the egg and blitz for a moment more. Tip the mixture out onto a work surface and bring together with the palm of your hand, working it until you have a lovely, smooth disc of dough. Divide into two, shape into discs and cover both with plastic wrap. Place in the fridge to rest for at least 30 minutes then, on a lightly dusted work surface, roll your pastry until about 5mm thick and drape into a loose-bottomed tart tin. Return to the fridge for another half an hour. Before baking or blind baking. You could freeze one disc of dough at this point, or even better roll it out and line a tart tin then freeze it like that, then when you fancy baking a tart quite quickly you can pull it out of the freezer and blind bake or fill and bake almost immediately.
.jpg)
-27.jpg)
Our first day wound up late in the afternoon after lots more scenes to shoot and one-on-one sessions between each student and Luisa. We then shared a casual dinner of our
Mandagery Creek Venison ragu and polenta then sat by the fire outside chatting for ages.
Day two started early with a pretty special breakfast picnic which I'll post about separately this week then morphed into a moving feast of flowers (beautifully arranged and facilitated by Miss Amelia Toohey of The Flower Era, more baking (which too will have its own post in a couple of days) and styling sessions with Steph. For me though, the highlight was a picnic lunch in the garden which of course, we all photographed the hell out of before eating!
-26.jpg)
Fresh Gingerbread
This was morning tea on day two. Hot with fresh ginger and a pinch of cayenne pepper, I often make this loaf cake at home and it's always popular. Plus, it lasts really well for a few days when wrapped tightly, so it's a handy one to keep in the cake tin. Recipe only slightly adapted from one given in the wonderful book
Breakfast, Lunch Tea by Rose Carrarini.
80g unsalted butter, softened
3/4 cup plain flour
2/3 cup wholemeal flour
1 tsp baking powder
1/2 tsp ground cinnamon
1/2 tsp ground mixed spice
A good pinch of cayenne pepper
A good pinch of salt
2 tbsp ground ginger
1/3 cup brown sugar
2 tbsp golden syrup
3 tbsp freshly grated ginger
2 tbsp molasses
3/4 tsp bicarb soda
2 eggs, lightly beaten
Preheat your oven to 180C and grease and line a loaf tin. Sift together the dry ingredients in a large bowl then place the butter, sugar syrup and ginger in the bowl of an electric mixer and beat until pale and creamy.
In a third bowl, beat the molsasses together with 1/2 tsp of the bicarb soda and then pour this into the creamed butter mixture. Finally, combine remaining bicarb soda with 3/4 cup boiling water. Pour this into the creamed butter mixture too. Fold dry and wet ingredients together then finally fold through the eggs. Spoon mixture into your prepared loaf tin, smooth the top then bake for 35 minutes or until the loaf feels springy to touch and has begun to pull away from the sides of the tin.
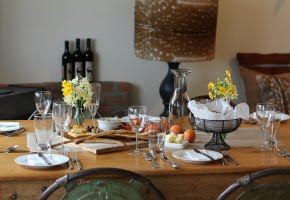
Our picnic lunch on day two comprised of some of my favourite foods shared in the sun, on a crisp Autumn day with great company. It was a very simple but pretty tasty affair of;
Mandagery Creek Venison salami from yours truly, hunks of mellow blue cheese by Orange's
Second Mouse Cheese Company and a warm salad of roasted kipflers and purple congo spuds (grown by our mate Dougal, see above) with an
aioli of elephant garlic (recipe here) and
Mum and Dad's olive oil.
We also had red capsicums, slowly roasted to the below recipe, bread and greens.
Piedmontese capsicums
These capsicum boats appear on antipasto plates all over Italy and are best when served at room temperature which makes them perfect for picnics. I pack them on a bed of salad leaves and by the time we’ve arrived wherever we’re picnic-ing, the capsicum’s juices have made a lovely dressing. Win win. Any leftovers make a great pasta sauce when chopped finely and tossed about in a hot frying pan for five minutes.
4 red capsicum, halved and seeded
4 tomatoes
8 anchovy fillets, drained and finely chopped
4 garlic cloves, finely chopped
2 tbsp capers, chopped
2 tbsp olive oil
1 tbsp balsamic vinegar
Mixed salad leaves, handful of basil leaves, to serve
Preheat oven to 160C. Lightly oil a large baking dish, place capsicum halves, cut-side up and well-spaced, in prepared dish. score a cross at the base of each tomato and slip into a saucepan of boiling water for 30 seconds. Dip in iced water and peel skin. Cut tomatoes in half lengthways and place one half, cut-side down, inside each capsicum boat.
Combine anchovy, garlic and capers and scatter over tomato. Drizzle with oil and balsamic and bake for 1 1/2 hours, until capsicum and tomato are soft and tender. Place mixed salad leaves on a large serving platter and top with capsicum. Scatter over basil leaves to serve.
-60.jpg)
For dessert we piled figs onto a board and added honeycomb, sweet dukkah and nougat. I've only just started making nougat at home, and have to say, I love the whole process and end result but of course there's lots of beautiful nougat to buy out there in the shops. This is my kind of dessert, easy to assemble, share and best of all, no washing up!
Lastly, with our lunch we drank glasses of quince cordial, which really was just a big jar of the poaching liquid from some quinces we'd had on our porridge this morning. I'd just reduced the leftover syrup by bringing it to a boil in a small saucepan and then simmering for about 10 minutes. The end result is gorgeous as a cordial, poured over ice cream, served hot with a simple vanilla pound cake or even mixed into a glass of sparkling wine.
Our next Local is Lovely Pracshop will be held on May 25/26 and we do have two 'day student' spots still available, 'day' meaning accommodation is not included in the price (though I can suggest a few options). If interested, please either send me an email (sophie_hansen@me.com)
or jump over here to book. Thank you!


-4.jpg)
-2.jpg)
-3.jpg)
.jpg)

.jpg)
-12.jpg)
-4.jpg)
-2.jpg)
-5.jpg)
-6.jpg)
-7.jpg)
-14.jpg)
-8.jpg)
-9.jpg)
-11.jpg)
-2.jpg)
-39.jpg)
-41.jpg)
.jpg)
-3.jpg)
-46.jpg)
-47.jpg)
-48.jpg)
-50.jpg)
-49.jpg)
-51.jpg)
-65.jpg)

-5.jpg)
.jpg)
-2.jpg)
-3.jpg)
-8.jpg)
-12.jpg)
-14.jpg)
.jpg)

-38.jpg)
-20.jpg)
-21.jpg)
-24.jpg)
-25.jpg)
-52.jpg)
-62.jpg)
-63.jpg)
-64.jpg)
-66.jpg)
-69.jpg)
-61.jpg)
-72.jpg)
-34.jpg)
-4.jpg)
-12.jpg)
-14.jpg)
.jpg)
-2.jpg)